
여러장의 이미지를 Carousel형태로 보여주기 위해 한번 react-responsive-carousel을 사용해보았다.
공식문서(https://www.npmjs.com/package/react-responsive-carousel)를 참고하여 이것저것 커스텀 해 보았다.
react-responsive-carousel
React Responsive Carousel. Latest version: 3.2.23, last published: 2 years ago. Start using react-responsive-carousel in your project by running `npm i react-responsive-carousel`. There are 438 other projects in the npm registry using react-responsive-caro
www.npmjs.com
설치
npm install react-responsive-carousel
사용법
먼저 사용하기 전에 이미지를 https://picsum.photos/ 에서 이미지를 가져와서 관리하였다.
import { useState, useEffect } from "react";
interface imageType {
	author: string;
	download_url: string;
	height: number;
	id: string;
	url: string;
	width: number;
}
export default function CarouselComponent() {
	const [imgList, setImgList] = useState<string[]>([]);

	useEffect(() => {
		async function fetchImages() {
			const response = await fetch("https://picsum.photos/v2/list?limit=5");
			const images = await response.json();
			setImgList(images.map((img: imageType) => img.download_url));
		}
		fetchImages();
	}, []);

	return (
    <div></div>
	);
}
그리고 기본적인 Carousel을 가져오기 위해 위 사이트에서 기본 예제를 가져왔다.
기본 Carousel을 가져오기 위해 먼저
import "react-responsive-carousel/lib/styles/carousel.min.css";
import { Carousel } from "react-responsive-carousel";를 해야한다.
기본 Carousel을 가져온 코드는 다음과 같다.
import { useState, useEffect } from "react";
import "react-responsive-carousel/lib/styles/carousel.min.css";
import { Carousel } from "react-responsive-carousel";
import styled from "styled-components";
interface imageType {
	author: string;
	download_url: string;
	height: number;
	id: string;
	url: string;
	width: number;
}
export default function CarouselComponent() {
	const [imgList, setImgList] = useState<string[]>([]);

	useEffect(() => {
		async function fetchImages() {
			const response = await fetch("https://picsum.photos/v2/list?limit=5");
			const images = await response.json();
			setImgList(images.map((img: imageType) => img.download_url));
		}
		fetchImages();
	}, []);

	return (
		<CarouselWrapper>
			<Carousel>
				{imgList.map((item, index) => (
					<div>
						<img key={index} src={item} alt={`Carousel item ${index}`} />
					</div>
				))}
			</Carousel>
		</CarouselWrapper>
	);
}

const CarouselWrapper = styled.div`
	width: 800px;
	height: 500px;
`;
기본적인 Carousel은 띄웠으니 이제 커스텀을 하려고 한다
커스텀
현재 몇 번째 이미지인지 띄우기(index관리)
먼저 요구받은 디자인은 아래와 같다

현재는 `현재 아이템 index / 전체 개수`로 띄우고 있는데 이걸 맞춤대로 고려하려고 한다.
먼저 공식 문서에서 props중에 count와 관련한 props가 있나 확인해보니

을 확인할 수 있었다.
{currentItem}과 {total}로 관리를 하니 index관련해서는 해당 변수를 사용하면 되지만, 반환형이 string 타입이라 해당 영역에서 보여지는 string만 변경할 수 있는 것 같았다.
원하는 디자인은 조금 투명한 영역 위에 값을 띄워야 하므로 index를 가져와 따로 설정해야하는 것 같았다.
이미지가 변경될 때마다 index를 가져와야 하므로 onChange 속성을 확인하였고


이와 같이 index와 item을 onChange에서 받을 수 있었다.
따라서 currentIndex를 onChange의 index로 따로 상태를 만들어 관리하여 띄울 수 있었다.
const [currentIndex,setCurrentIndex] = useState<number>(1);

<Carousel
  onChange={(index)=>setCurrentIndex(index)}
>
</Carousel>
원래 있던 status는 맘에 안들기때문에 `showStatus`로 지워주고 원하는 스타일대로 스타일링을 해주면

이렇게 만들 수 있다.
참고로 onChange에서 index는 0부터 시작하므로 `setCurrentIndex(index+1)`을 해줘야한다.
코드는 다음과 같다.
import { useState, useEffect } from "react";
import "react-responsive-carousel/lib/styles/carousel.min.css";
import { Carousel } from "react-responsive-carousel";
import styled from "styled-components";
interface imageType {
	author: string;
	download_url: string;
	height: number;
	id: string;
	url: string;
	width: number;
}
export default function CarouselComponent() {
	const [imgList, setImgList] = useState<string[]>([]);
	const [currentIndex, setCurrentIndex] = useState<number>(1);

	useEffect(() => {
		async function fetchImages() {
			const response = await fetch("https://picsum.photos/v2/list?limit=5");
			const images = await response.json();
			setImgList(images.map((img: imageType) => img.download_url));
		}
		fetchImages();
	}, []);

	return (
		<CarouselWrapper>
			<Carousel
				showStatus={false}
				onChange={(index) => setCurrentIndex(index + 1)}
			>
				{imgList.map((item, index) => (
					<div>
						<img key={index} src={item} alt={`Carousel item ${index}`} />
					</div>
				))}
			</Carousel>
			<CarouselCounter>
				<CarouselStatusP>
					<div>{"이미지 제목"}</div>
					<div>{`${currentIndex} / ${imgList.length}`}</div>
				</CarouselStatusP>
			</CarouselCounter>
		</CarouselWrapper>
	);
}

const CarouselWrapper = styled.div`
	width: 800px;
	height: 500px;
	position: relative;
`;

const CarouselCounter = styled.div`
	width: 100%;
	height: 40px;
	background-color: rgba(0, 0, 0, 0.2);
	position: absolute;
	top: 0;

	display: flex;
	align-items: center;
`;

const CarouselStatusP = styled.p`
	width: 100%;
	box-sizing: border-box;
	padding: 0 20px;
	color: white;
	text-align: right;
	display: flex;
	justify-content: space-between;
`;
하단 인디케이터 커스텀(indicator custom)
먼저 현재 기본적으로 적용이 되어 있는 indicator은 흰 원으로 보여주며 그닥 이쁘지는 않은 디자인이다.

따라서 이 인디케이터도 커스텀 할 예정이다. 다행히도 공식문서에서 인디케이터를 커스텀할 수 있게 쉽게 설명을 해 주었다.
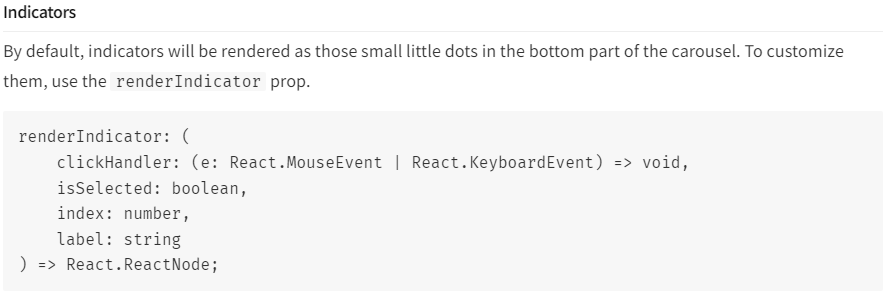
return이 React.ReactNode인데 어떠한 구조로 return을 해야하는 지 감을 잡기 위해 일단 index만 띄위도록 해 보았다.
<Carousel
    showStatus={false}
    onChange={(index) => setCurrentIndex(index + 1)}
    renderIndicator={(onClickHandler, insSelected, index, label) => {
        return <div>{index}</div>;
    }}
>
</Carousel>
이렇게 보이는데 기본적으로 div가 가로 영역을 모두 차지하여 그런 것 같아 span태그로 바꿔주고 index가 0부터 시작하여 1을 더하여 반환해주었다.
<Carousel
    showStatus={false}
    onChange={(index) => setCurrentIndex(index + 1)}
    renderIndicator={(onClickHandler, insSelected, index, label) => {
        return <span>{index+1}</span>;
    }}
>
</Carousel>하지만 이대로하면 클릭해도 아무런 효과가 없이 그냥 보여지는 것 뿐이다.
이제 클릭시에 대부분의 기능이 동작하도록 하고 약간의 스타일링을 주어보자! 근데 또 스타일링을 주려고 하니 막상 이쁜 디자인이 없는 것 같아 기존의 캐러셀에서 선택된 것에 동그라미만 조금 크게 해보려고 한다.

전체 코드는 다음과 같다.
import { useState, useEffect } from "react";
import "react-responsive-carousel/lib/styles/carousel.min.css";
import { Carousel } from "react-responsive-carousel";
import styled from "styled-components";

interface imageType {
	author: string;
	download_url: string;
	height: number;
	id: string;
	url: string;
	width: number;
}
interface IndicatorProps {
	isSelected: boolean;
}

export default function CarouselComponent() {
	const [imgList, setImgList] = useState<string[]>([]);
	const [currentIndex, setCurrentIndex] = useState<number>(1);

	useEffect(() => {
		async function fetchImages() {
			const response = await fetch("https://picsum.photos/v2/list?limit=5");
			const images = await response.json();
			setImgList(images.map((img: imageType) => img.download_url));
		}
		fetchImages();
	}, []);

	return (
		<CarouselWrapper>
			<Carousel
				showStatus={false}
				onChange={(index) => setCurrentIndex(index + 1)}
				renderIndicator={(onClickHandler, isSelected, index, label) => {
					return (
						<Indicator
							onClick={onClickHandler}
							onKeyDown={onClickHandler}
							isSelected={isSelected}
						/>
					);
				}}
			>
				{imgList.map((item, index) => (
					<div>
						<img key={index} src={item} alt={`Carousel item ${index}`} />
					</div>
				))}
			</Carousel>
			<CarouselCounter>
				<CarouselStatusP>
					<div>{"이미지 제목"}</div>
					<div>{`${currentIndex} / ${imgList.length}`}</div>
				</CarouselStatusP>
			</CarouselCounter>
		</CarouselWrapper>
	);
}

const CarouselWrapper = styled.div`
	width: 800px;
	height: 500px;
	position: relative;
`;

const CarouselCounter = styled.div`
	width: 100%;
	height: 40px;
	background-color: rgba(0, 0, 0, 0.2);
	position: absolute;
	top: 0;

	display: flex;
	align-items: center;
`;

const CarouselStatusP = styled.p`
	width: 100%;
	box-sizing: border-box;
	padding: 0 20px;
	color: white;
	text-align: right;
	display: flex;
	justify-content: space-between;
`;

const Indicator = styled.span<IndicatorProps>`
	width: ${(props) => (props.isSelected ? "12px" : "10px")};
	height: ${(props) => (props.isSelected ? "12px" : "10px")};
	background-color: ${(props) =>
		props.isSelected ? "white" : "rgba(255, 255, 255, 0.5)"};
	border-radius: 50%;
	margin: 0 5px;
	display: inline-block;
	cursor: pointer;
	box-shadow: 0px 0px 5px 0px rgba(0, 0, 0, 0.5);
`;
마무리
react-responsive-carousel을 이용하여 어느정도 custom을 해 보았다. 전혀 어렵지 않고 공식 문서만 참고하면 누구나 쉽게 custom 할 수 있을 것 같다
프론트엔드 개발자라면 carousel을 직접 구현해야 하지만 시간이 너무 없다면 이런 라이브러리를 사용해도 되지않을까?
조심스럽게 지지해본다.
'Frontend > React' 카테고리의 다른 글
| [React] 핸드폰 인증번호 타이머 기능을 구현해보자 (2) | 2024.02.10 |
|---|---|
| vscode jsx파일 quick fix import안되는 오류 해결 (0) | 2024.02.05 |
| React에서 2개의 그래프를 동시에 이쁘게 띄워보자 (react chart js) (0) | 2024.02.02 |